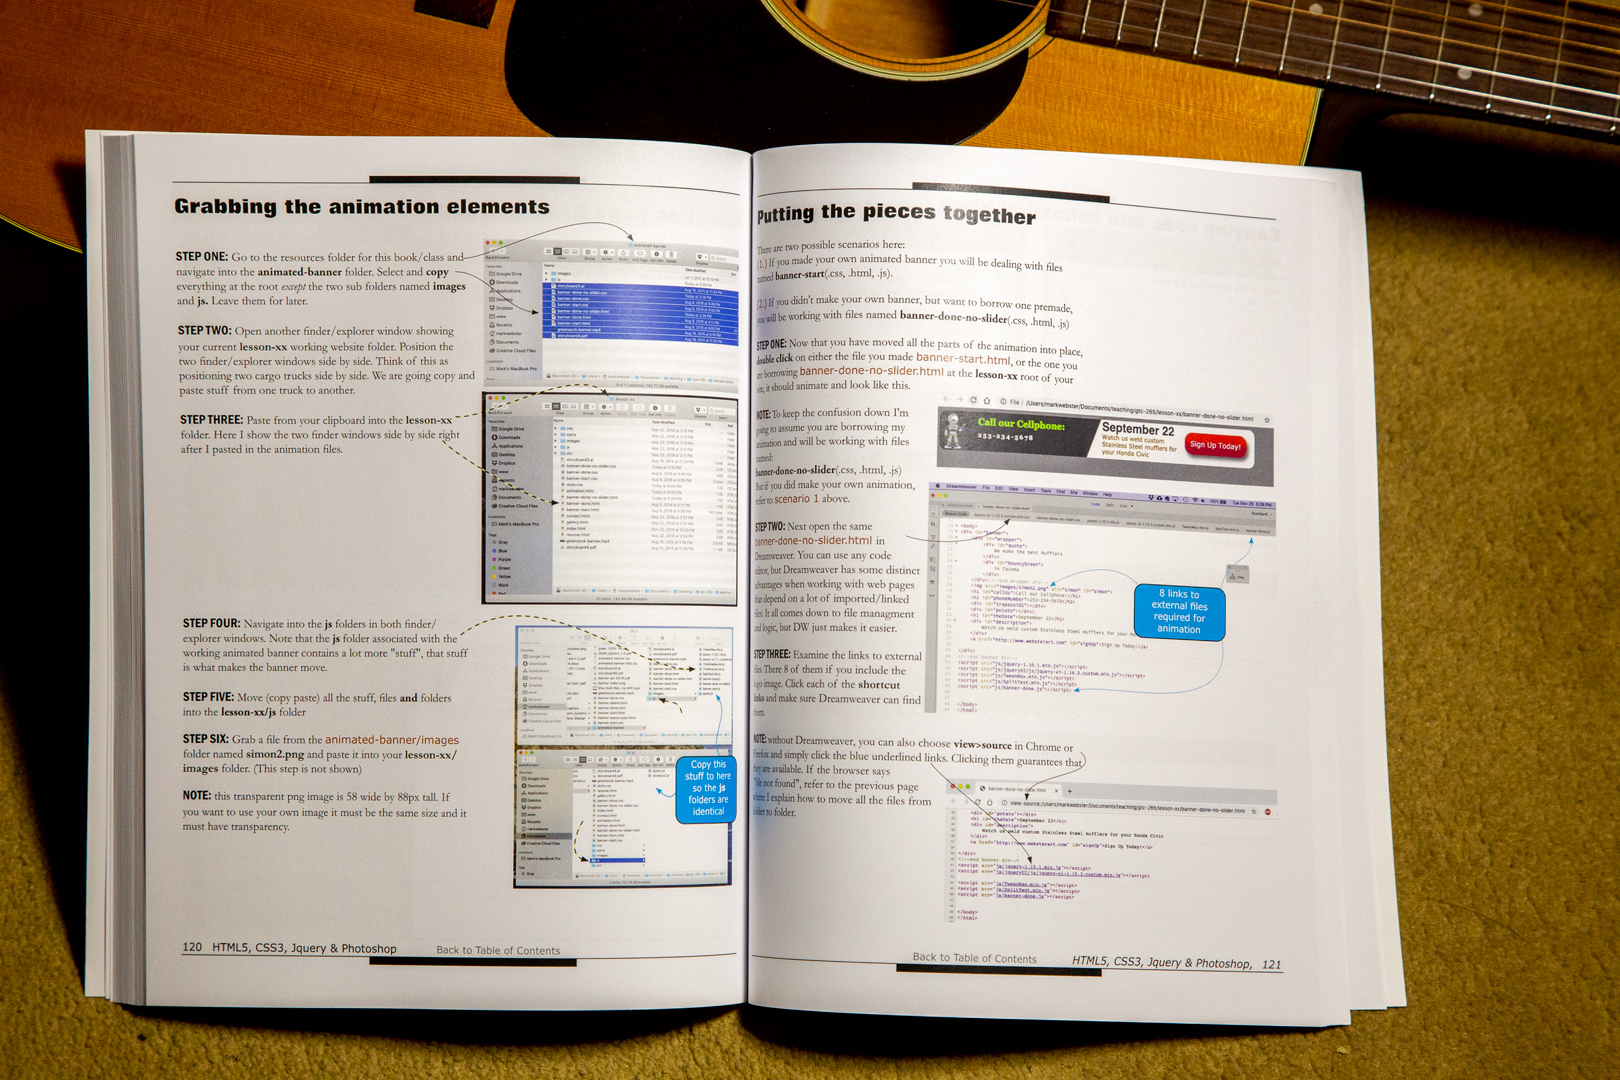
For the last 18 years I’ve been teaching college students how to build websites, no prior experience required. I’ve written a step-by-step textbook on the process.
My book is not just another pretty face. The design and content has been tested under fire. When something broke, I re-wrote it. My students are quick to call me on errors. They are my best editors!
I had zero desire to write a book. But to do the job, I needed one, and I was tired of buying books from other authors that didn’t work in my classrooms. I needed a textbook that explained, in the shortest possible time, how to build a state of the art web site…to total beginners.
My computer savvy students can race through it at their own pace. However, the book is written so well that even students who are less confident can still follow along, page by page.
I teach wordpress at work, and last quarter I had a student who wanted a really fancy wordpress site. She didn’t like any of the free themes. I told her I’d been tinkering with a custom theme for a couple years, but had never tried to use it on real, meaningful content. I simply had too many questions about how a custom theme worked in real life.
She was willing to put in the time, and I was being paid to teach…so we chipped away at it in the afternoons for a few weeks. Her website ended up looking so good I decided to try my hand coded custom theme on my 9 year old wordpress site. You are looking at it now. It’s a reasonably close match to my main www.websterart.com website, which is all handbuilt, not using wordpress. I’ve yet to try getting the PhotoSwipe plugin to work. Well, I did get it to work with my theme, but it caused problems.
WordPress, by default, puts thumbnails in definition lists. But PhotoSwipe requires them to be in figure elements. And I’d like to style the figure elements in variable column-count columns. However, there is simply too much code going on with his switch from dl’s to figures, which happens in JavaScript. More on that later.
There is a lot going on here. As far as explaining it, I don’t even know where to start. I may write a tutorial on it later. If you’d like to get the zip file of the theme, it is here. Be forewarned though, a lot of what goes on is in the form of widgets, menus and plugins that get added after you activate the theme in the wordpress dashboard.
Clint, Craig and I skied up Mt. St. Helens yesterday. I ate steak and potatoes the night before but it wasn’t enough. At the halfway point we could see figures on the summit, but my endurance was very low. I could skin up about 100 feet, then I’d have to pause for a while to catch my breath, and repeat. The distances between pauses got shorter the higher I got.
I apologized to Clint for going so slow, and he said he wasn’t in any hurry, that I should take my time. My son and Craig are both superb skiers, while I am mediocre at best. I was the oldest guy on the mountain by at least 20 years. Most of them were between 25 and 35. Most of the 100 people we saw were on snowshoes or on foot. It’s weird that only about 1 in 5 were on skis. Skis made the trip down a lot faster, and in spots the skiing was excellent, feeling like the steep section of a blue run at Crystal i.e. the Forest Queen chair lift. The skiing down Worm Flow couloir was fairly easy in spring corn, though it had some cement snow in places.
Down lower on the main hiking route there were tons of post hole tracks which made for choppy skiing. I was so tired by then (10 mile round trip, 4500 feet gain) that all I could do was shaky snow plow turns. We were racing the light, as getting caught in the dark on icy snow was not an attractive option.
Me and my son Clint
Summit shot, me, Craig & Clint
St. Helens crater
Clint and Craig lunch break, Mt. Adams in the background
I’ve been studying Python. My Django studies got weird because Django runs in Python and I’d never done Python. Sometimes I feel like I’m trying to learn Japanese, French, Russian and Spanish all at the same time.
This was my latest exercise. This is the Python code for pulling JSON data from the USGS Earthquake website. It formats the data and then spits it back out as a list of recent earthquakes with information about strength, location and whether it was felt.
#
# Example file for parsing and processing JSON
#
import urllib
import json
def printResults(data):
# Use the json module to load the string data into a dictionary
theJSON = json.loads(data)
# now we can access the contents of the JSON like any other Python object
if "title" in theJSON["metadata"]:
print(theJSON["metadata"]["title"])
# output the number of events, plus the magnitude and each event name
count = theJSON["metadata"]["count"]
print (str(count) + " events recorded")
# for each event, print the place where it occurred
for i in theJSON["features"]:
print(i["properties"]["place"])
print("-----------------\n")#this runs after the for loops is done
# print the events that only have a magnitude greater than 4
for i in theJSON["features"]:
if i["properties"]["mag"] >= 4.0:
print "%2.1f" % i["properties"]["mag"], i["properties"]["place"]
print("-----------------\n")#this runs after the for loops is done
# print only the events where at least 1 person reported feeling something
print("Events that were felt: ")
for i in theJSON["features"]:
feltReports = i["properties"]["felt"]
if feltReports != None:
if feltReports > 0:
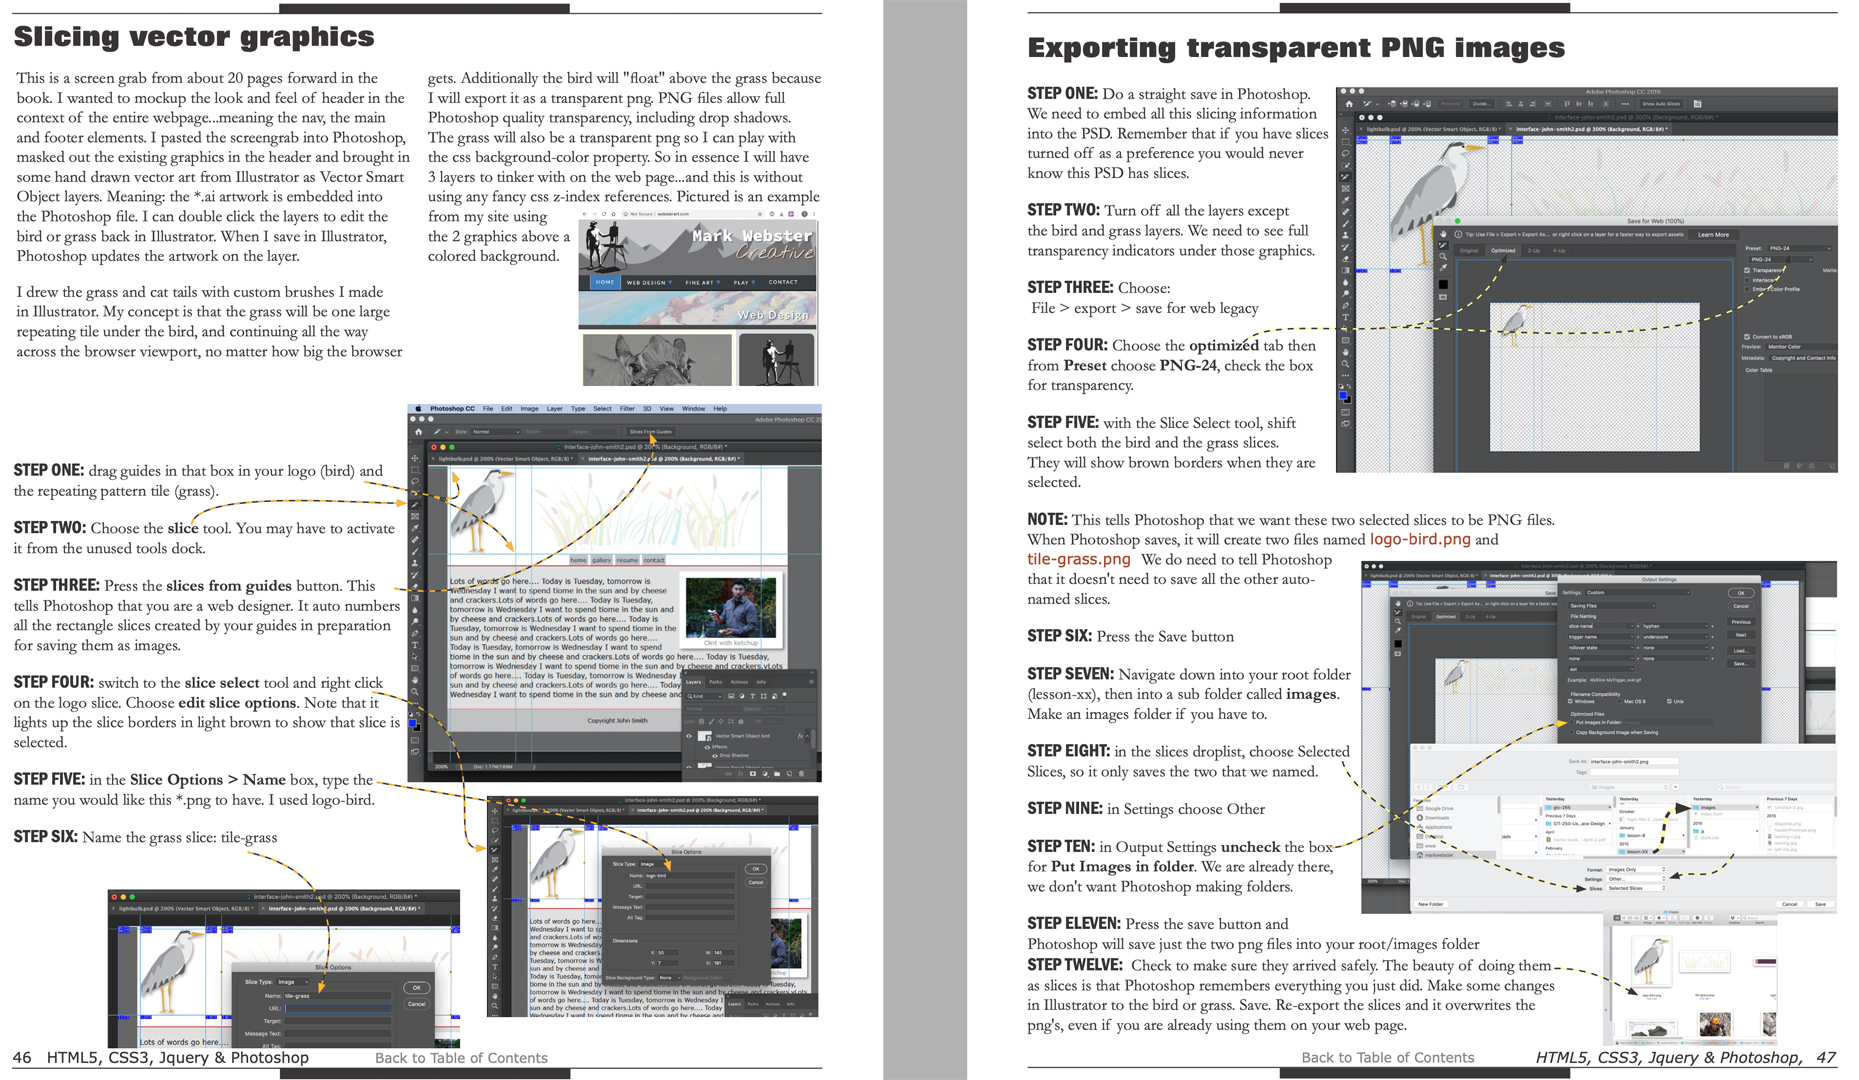
print "%2.1f" % i["properties"]["mag"], i["properties"]["place"], " reported " + str(feltReports) + " times"
def main():
# define a variable to hold the source URL
# In this case we'll use the free data feed from the USGS
# This feed lists all earthquakes for the last day larger than Mag 2.5
urlData = "http://earthquake.usgs.gov/earthquakes/feed/v1.0/summary/2.5_day.geojson"
# Open the URL and read the data
webUrl = urllib.urlopen(urlData)
print ("result code: " + str(webUrl.getcode()))#returns: 200 = true, it got data
if (webUrl.getcode() == 200):
data = webUrl.read()
printResults(data)
else:
print("Received error, cannot parse results")
if __name__ == "__main__":
main()
I spent a full day trying to debug an indexedDB JavaScript lesson. It would work on my iPhone, and on codepen, but nowhere else. It wouldn’t work at all on my MacBook, except for codepen.com. I knew my code was clean because typing errors are always the first thing I check. And the way it was behaving, I could tell it was some kind of security blockage either on the hosting servers or in the browsers.
While searching for an answer I came across another free online tutorial, and this one worked. I don’t know why it worked because it was structured much the same, though with subtle differences. Anyway I was able to combine stuff I’d learned in both tutorials to make a pretty sweet little pure HTML5 and vanilla JavaScript note taking app.
Once I had it running I realized it was missing the drag and drop functionality I’ve come to expect in apps like wunderlist. After a quick google search, I found a tutorial that built a drag and drop list. Sadly, that one has a problem on mobile devices. You can drag the list items on a computer, but not on a phone. Phones have a different set of responses and the eventListeners are set up completely different from computers.
And finally I had a very nice little “todo” note taker app. It’s still not hooked up to a database…that may be coming. But it’s actually quite useable. There are 400 lines of code, not counting the slip javascript library. I prettied it up with some style sheets, and tried to make it mobile friendly.
It’s tricky to embed it in WordPress. There are conflicts with classes and ID’s. So instead, here is a direct link on my server.. It remembers your list items as long as you don’t clear your browsers cache. It does not sync with your computer though… You need wunderlist for that.
There are two js files that run it. This is the one that hooks it up to the indexedDB database.
var todoDB = (function(){
var tDB = {};
var datastore = null;
//todo: add methods for interacting with db here
//open connection to the datastore
tDB.open = function(callback){
//database version
var version = 1;
//open connection to db
var request = indexedDB.open('todos', version);
//handle upgrades to datastore
request.onupgradeneeded = function(e) {
var db = e.target.result;
e.target.transaction.onerror = tDB.onerror;
//delete old datastore
if(db.objectStoreNames.contains('todo')) {
db.deleteObjectStore('todo');
}
//create a new datastore
var store = db.createObjectStore('todo', {
keyPath: 'timestamp'
});
};//end request.onupgradeneeded function
//handle success datastore access
request.onsuccess = function(e) {
//get a reference to the DB
datastore = e.target.result;
//execute callback
callback();
};
//handlerrors opening datastore
request.onerror = tDB.onerror;
};//end tDB.open = function
//fetch all the todo items in the datastore
tDB.fetchTodos = function(callback) {
var db = datastore;
var transaction = db.transaction(['todo'], 'readwrite');
var objStore = transaction.objectStore('todo');
var keyRange = IDBKeyRange.lowerBound(0);
var cursorRequest = objStore.openCursor(keyRange);
var todos = [];
transaction.oncomplete = function(e) {
//execute callback
callback(todos);
};
cursorRequest.onsuccess = function(e){
var result = e.target.result;
if(!!result == false) {
return;
}
todos.push(result.value);
result.continue();
};
cursorRequest.onerror = tDB.onerror;
};
/**
* create new todo item
*/
tDB.createTodo = function(text, callback){
// get reference to db
var db = datastore;
//intiate new transaction
var transaction = db.transaction(['todo'], 'readwrite');
//get the datastore
var objStore = transaction.objectStore('todo');
//create a timestamp for todo item
var timestamp = new Date().getTime();
//create an object for the todo itemsv
var todo = {
'text': text,
'timestamp': timestamp
};
//create the datastore cursorRequest
var request = objStore.put(todo);
//handle the success put
request.onsuccess = function(e) {
//execute callback
callback(todo);
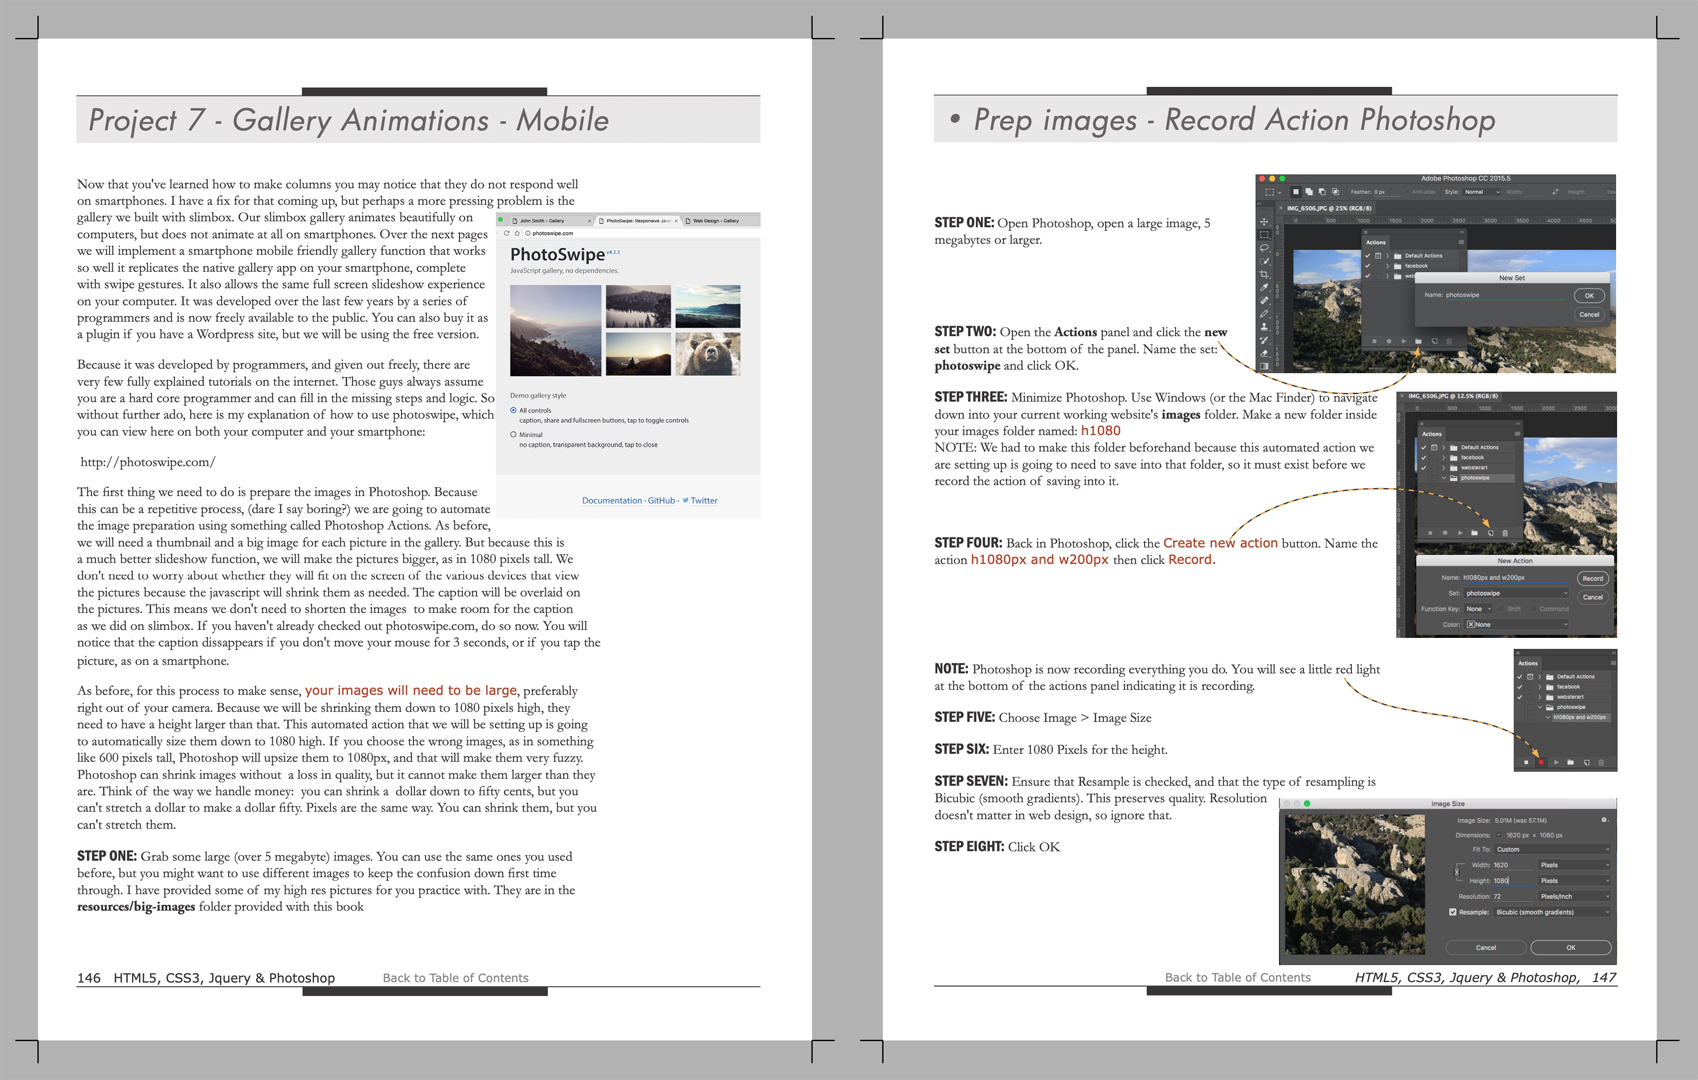
};
//handle handlerrors
request.onerror = tDB.onerror;
};//end tDB.createTodo function
/**
* delete a todo item
*/
tDB.deleteTodo = function(id, callback){
var db = datastore;
var transaction = db.transaction(['todo'], 'readwrite');
var objStore = transaction.objectStore('todo');
var request = objStore.delete(id);
request.onsuccess = function(e) {
callback();
}
//writes errors to the console
request.onerror = function(e){
console.log(e);
}
};//end tDB.deleteTodo function
//export the tDB object
return tDB;
}());
And here is the one where I did quite a bit of customization, you can see the drag and drop “slip” references at the bottom.
window.onload = function(){
//todo: app code goes here
//display todo items by passing in the refreshTodos function as a parameter?
todoDB.open(refreshTodos);
//get references to html elements
var newTodoForm = document.getElementById('new-todo-form');
var newTodoInput = document.getElementById('new-todo');
var submitBtn = document.querySelector('.submitBtn');
//my form submitter addEventListener
newTodoForm.addEventListener('submit', triggerForm);
submitBtn.addEventListener('click', triggerForm);
//handle the form sumissions
function triggerForm() {
//get text
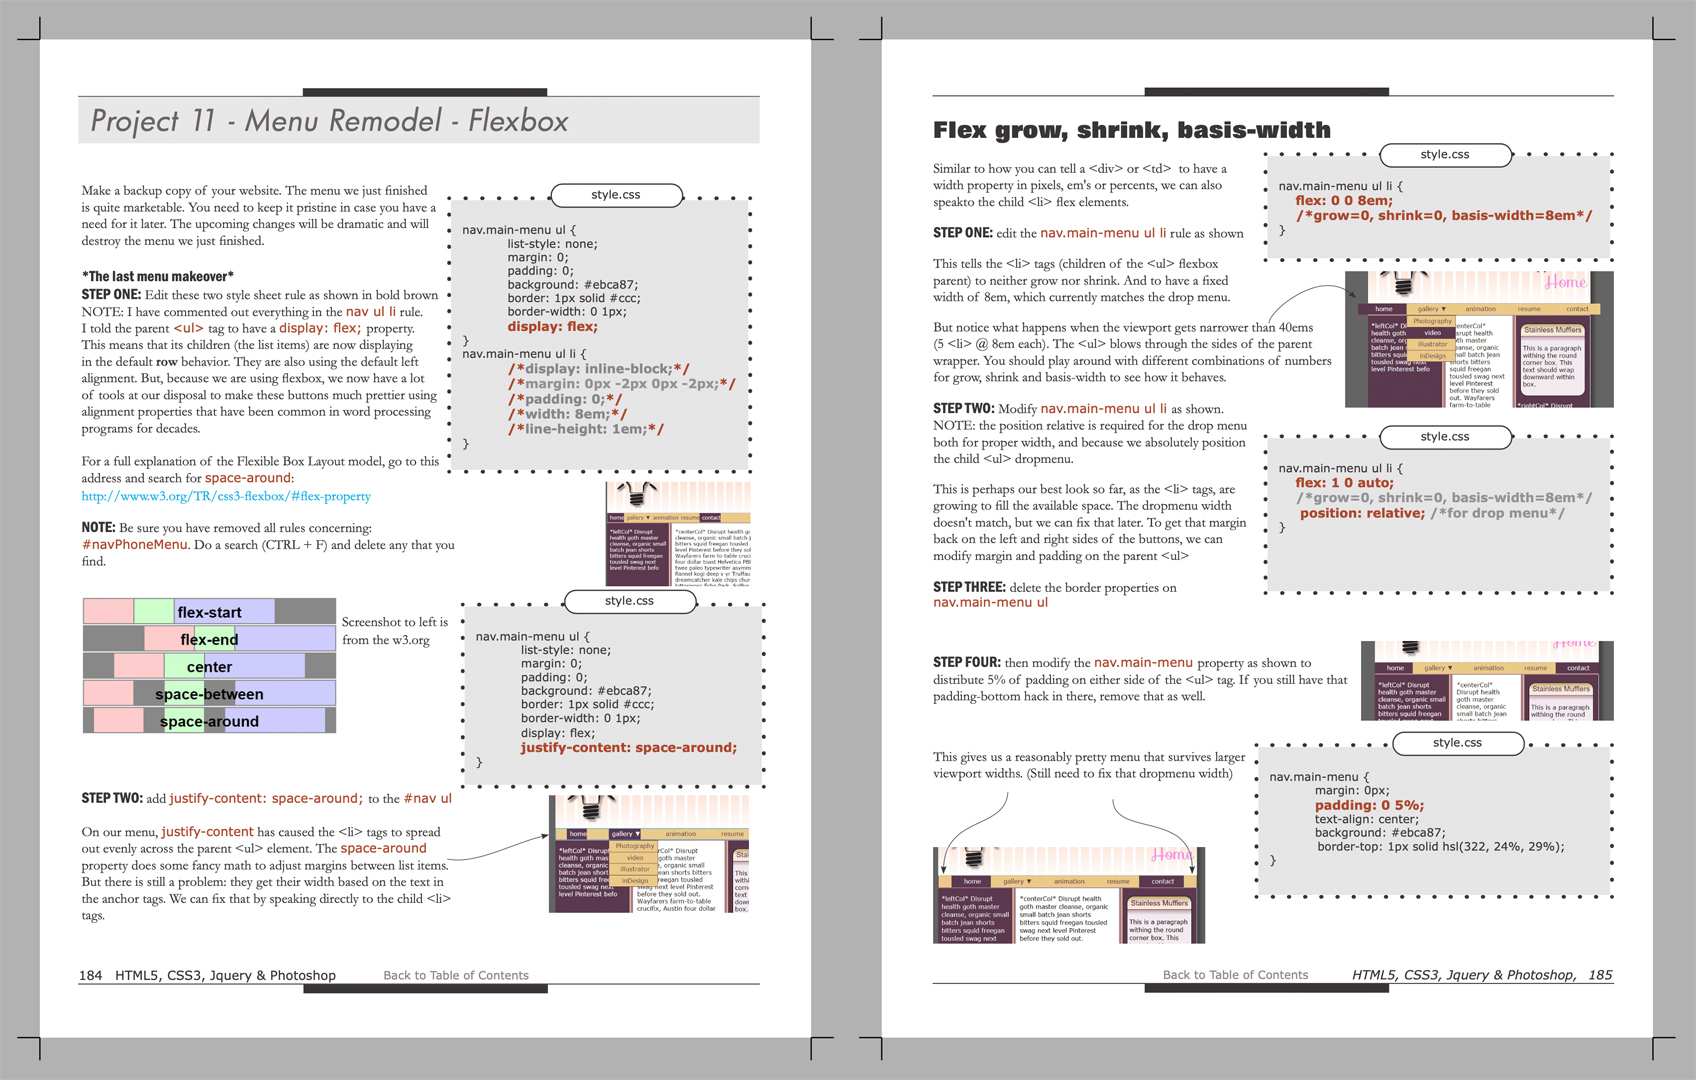
var text = newTodoInput.value;
//check tomake sure test is not blank or just spaces
if(text.replace(/ /g,'') != ''){
//create the todo item
todoDB.createTodo(text, function(todo) {
refreshTodos();
});
}
//reset input field
newTodoInput.value = '';
//don't send the form
return false;
};//end triggerForm function
//update the list of todo items.
function refreshTodos(){
todoDB.fetchTodos(function(todos){
var todoList = document.getElementById('todo-items');
todoList.innerHTML = '';
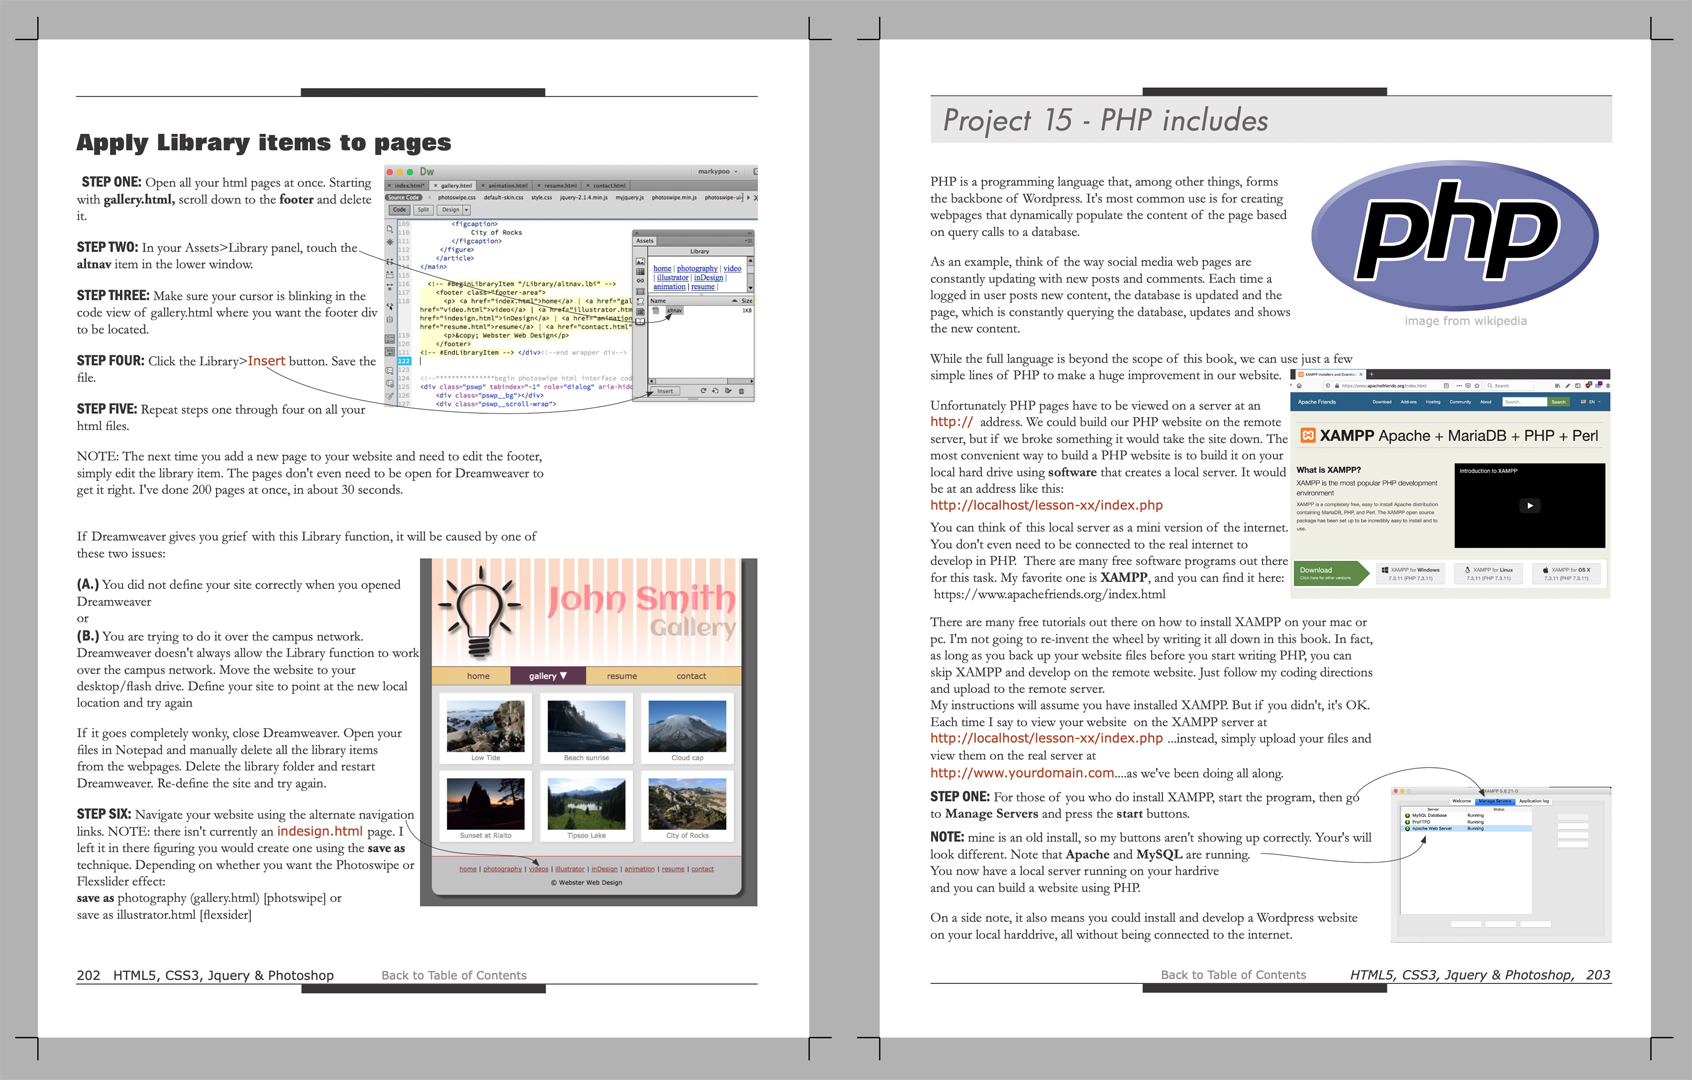
for(var i = 0; i < todos.length; i++){
//read the todo items backwards-most recent first
var todo = todos[(todos.length - 1 - i)];
var li = document.createElement('li');
li.id = 'todo-' + todo.timestamp;
//li.setAttribute('draggable', 'true');
var checkbox = document.createElement('button');
checkbox.textContent = 'X';
checkbox.className = 'todo-checkbox';//""
checkbox.setAttribute('data-id', todo.timestamp);//""
var span = document.createElement('span');
span.innerHTML = todo.text;
li.appendChild(span);
li.appendChild(checkbox);
todoList.appendChild(li);
//set up listener checkbox
checkbox.addEventListener('click', function(e){
var id = parseInt(e.target.getAttribute('data-id'));
todoDB.deleteTodo(id, refreshTodos);
});
}//end for i < todos.length
//my non mobile dragger function used to be here.
});//end todoDB.fetchTodos
newTodoInput.focus();
}//end function refreshTodos
//begin slippery functions
//slideThem = <ul id="todo-items">
var slideThem = document.querySelector('#todo-items');
new Slip(slideThem);//apply slip library to <ul>
slideThem.addEventListener('slip:reorder', function(e){
e.target.parentNode.insertBefore(e.target, e.detail.insertBefore);
});
//end slipper function
};//end window.onload
The style sheet got fairly long because…well…I’m sort of artsy and I wanted it to be pretty.
I’ve been using both Evernote and Wunderlist for years. I’ve built a ToDo list before in jQuery that came close to Wunderlist. It had draggable list items, and delete item checkboxes. But when studying JavaScript, jQuery is considered cheating.
So I was pleased to see this one show up in my latest online lesson. I prettied it up with some style sheets. I’m waiting until later in my studies to figure out how to connect it to a database, hopefully with something like Node.js. For now though, it just works in the browser session memory. It’s cool to make useful things that actually work. This one embedded in WordPress has some extra padding related to WordPress styles, but the direct link outside of WordPress works as intended.
We had an inch of snow today. I took a brisk walk around the block on the sunny, but slippery sidewalks before getting back to work programming.
Yesterday our exercise was to remove the default html5 video player controls, then substitute a handbuilt controller. As an added challenge, they asked if we could program in a clickable playhead. They gave us a couple clues, but thinking it through was a brain squeezer. There was a 190 pixel wide area where the progress bar walked across as the video played.
Somehow that area needed to become clickable. When clicked, the video should play at that percentage. Meaning, if you click half way across the progress bar area, the video should jump to the halfway point.
I can’t post the video here in WordPress without a lot of trouble from width properties. So instead I’m linking to it here as an external page. But the code is shown below. The magic in the clickable progress bar is on line 157: function jumpTo(e){…}
My solution isn’t a true draggable playhead, but it does at least navigate, and displays a nice red bar when clicked.
var media = document.querySelector('video');
var controls = document.querySelector('.controls');

var play = document.querySelector('.play');
var stop = document.querySelector('.stop');
var rwd = document.querySelector('.rwd');
var fwd = document.querySelector('.fwd');

var timerWrapper = document.querySelector('.timer');
var timer = document.querySelector('.timer span');
var timerBar = document.querySelector('.timer div');
var intervalRwd;
var intervalFwd;
//removes the default html5 controls
media.removeAttribute('controls');
controls.style.visibility = 'visible';

play.addEventListener('click', playPauseMedia);

function playPauseMedia(){

  /*below fixes a problem that occurs if they try to stop
  while fast forward or fast reverse is running*/
  rwd.classList.remove('active');
  fwd.classList.remove('active');
  clearInterval(intervalRwd);
  clearInterval(intervalFwd);

  if(media.paused) {
    play.setAttribute('data-icon', 'u');
    media.play();
  } else {
    play.setAttribute('data-icon','P');
    media.pause();
  }
}//end function playPauseMedia

stop.addEventListener('click', stopMedia);
media.addEventListener('ended', stopMedia);

function stopMedia() {
  media.pause();
  media.currentTime = 0;
  play.setAttribute('data-icon','P');

  /*below fixes a problem that occurs if they try to stop
  while fast forward or fast reverse is running*/
  rwd.classList.remove('active');
  fwd.classList.remove('active');
  clearInterval(intervalRwd);
  clearInterval(intervalFwd);
}

rwd.addEventListener('click', mediaBackward);
fwd.addEventListener('click', mediaForward);

function mediaBackward(){
  clearInterval(intervalFwd);
  fwd.classList.remove('active');

  if(rwd.classList.contains('active')){
    rwd.classList.remove('active');
    clearInterval(intervalRwd);
    media.play();
  } else {
    rwd.classList.add('active');
    media.pause();

    /*
    If it hasn't yet been set, we add the active
    class to the rwd button using classList.add(),
    pause the video using HTMLMediaElement.pause(),
    then set the intervalRwd variable to equal
    a setInterval() call. When invoked, setInterval()
    creates an active interval, meaning that
    it runs the function given as the first
    parameter every x milliseconds,
    where x is the value of the 2nd parameter.
    So here we are running the windBackward()
    function every 200 milliseconds — we'll
    use this function to wind the video backwards
    constantly. To stop a setInterval() running,
    you have to call clearInterval(),
    giving it the identifying name of the
    interval to clear, which in this case
    is the variable name intervalRwd
    */
    intervalRwd = setInterval(windBackward, 200);
  }
}//end function mediaBackward

function mediaForward(){
  clearInterval(intervalRwd);
  rwd.classList.remove('active');

  if(fwd.classList.contains('active')){
    fwd.classList.remove('active');
    clearInterval(intervalFwd);
    media.play();
  } else {
    fwd.classList.add('active');
    media.pause();
    intervalFwd = setInterval(windForward, 200);//setInterval() takes two parameters: a function & milliseconds
  }
}//end function mediaForward

function windBackward(){
  if(media.currentTime <= 3){
    //rwd.classList.remove('active');
    //clearInterval(intervalRwd);
    stopMedia();
  } else {
    media.currentTime -= 3;
  }
}//end function windBackward

function windForward(){
  if(media.currentTime >= media.duration - 3){
    //fwd.classList.remove('active');
    //clearInterval(intervalFwd);
    stopMedia();
  } else {
    media.currentTime += 3;
  }
}//end function windBackward

media.addEventListener('timeupdate', setTime);

function setTime(){
  var minutes = Math.floor(media.currentTime / 60);//floor rounds down to nearest integer, if 90 seconds, returns: 1
  var seconds = Math.floor(media.currentTime - minutes * 60);//if 90 seconds, returns: 30
  var minuteValue;
  var secondValue;

  if(minutes < 10){
    minuteValue = '0' + minutes;
  } else {
    minuteValue = minutes;
  }

  if (seconds < 10){
    secondValue = '0' + seconds;
  } else {
    secondValue = seconds;
  }

  var mediaTime = minuteValue + ':' + secondValue;
  timer.textContent = mediaTime;

  //any elements width is found via: element.clientWidth
  var barLength = timerWrapper.clientWidth * (media.currentTime/media.duration);
  timerBar.style.width = barLength + 'px';
}//end function setTime()

timerWrapper.addEventListener('click', jumpTo)
var durationPercent;
function jumpTo(e){
  durationPercent = Math.floor((e.x - 273) / 2);
  media.currentTime = durationPercent * (media.duration / 100);
  timerBar.classList.add('playHead');
  console.log('xMouse: ' + e.x) + ', ' +  console.log('yMouse: ' + e.y);
}

// timerWrapper.onclick = function(e){
//   console.log('xMouse: ' + e.x) + ', ' +  console.log('yMouse: ' + e.y);
// }
The drawing above is a self portrait done so long ago I can’t even remember the year. I have dark hair, so it was probably during my twenties or thirties.
I used to program games in flash that had rockets flying in space. They had motors that fired, directional thrusters, variable velocity, collision detection, gravity, friction and bounce. But flash is dead…or at least it doesn’t work on phones, and I like to make things that work on phones.
Now I’ve just finished another excellent lesson at https://developer.mozilla.org It was an applied application of OOP as it is used in JavaScript. It didn’t make a rocket, but it did make a bunch of balls that change colors when they collide. I added in a drop list that lets you change the number of balls. I got it to show up here in wordpress via the shortcoder plugin.
On February 3 I posted the working example from a calendar lesson I had learned in JavaScript. All it did was generate months of the year with the correct number of days, depending on which month you selected. It was dumb but it got me thinking.
As I moved forward in my JavaScript studies I was mulling over a way to make use of that calendar. To the right of this story you will see two calendars. The top one is a free WordPress plugin. I didn’t build it, I just installed the plugin. It lets you switch between journal entries going back to 2011 when I first started using WordPress. All the post entry links are automatically populated from the WordPress database.
But I was keeping an online journal long before they invented WordPress. I have been writing since late 1997, a year after I got my first computer. There was a story that year in the Seattle times about a woman who was keeping an online journal. She started it in ’97, and it inspired me to do the same. But as my journal grew it was difficult to build a navigation system back through the entries. I’ve struggled with a number of solutions, as you will see if you prowl around.
The one I used the longest was a flash calendar that I built from scratch. But even I refuse to download flash anymore. So if I was on a smartphone, I couldn’t navigate my own journal until just recently.
My solution? Build a real working calendar in Javascript and embed it on every page , or at least the pages starting at September 2001, which is when I changed the interface drastically. To get it to work I had to create a JavaScript array for every year, about 10 of them.
As you can see to the right, I also embedded that new JavaScript calendar right here in WordPress below the plug in calendar. I got it to appear by using a WordPress plugin called shortcoder. The shortcoder plugin presents itself as a box in which you can paste html, css and js. Then it gives you a short little snippet of code, called a shortcode. That shortcode references the longer code. I pasted the shortcode snippet into a standard text widget, and dropped the widget into my WordPress sidebar.
You can see it all working here. It’s not search engine friendly yet…I have to think about that. I’ve linked to the contents (hand built index of the journal) page. It has links out to most of the good writing, perhaps that will negate the fact that a dynamically generated calendar can’t be spidered by google.
I’m fairly happy with this solution. It’s not perfect, I think Jessamyn does a better job of archiving, but at least mine was a fun way to practice my JavaScript.
Here is the array for the year 2000. Note that I didn’t start writing until March of 1999, or, at least that is the first named file: three99.html
/**************
begin 1999
****************/

//makes an array of the names of the html files for the year.
var calendar1999 = ['three99', 'four99', 'five99', 'six99', 'seven99','eight99', 'nine99', 'ten99', 'eleven99', 'twelve99'];

function createMonths1999(){
  //captures the <ul id="joynal1999">
  var joynal1999 = document.getElementById('joynal1999');//
  for(let i = 0; i < calendar1999.length; i++){

    //makes virtual <li></li> but doesn't use it in DOM yet
    var listItem = document.createElement("li");

    //makes virtual <a></a> but doesn't use it in DOM yet
    var anchorTag = document.createElement("a");

    /*makes a snippet of text containing a number based on loop iteration
    first one will be 0+4 = 4 which is April of 99...later found entries in March, and changed it to 3*/
    var monthNumber = document.createTextNode(i+3);

    //<a>4</a>//inserts 4 into virtual anchor tag
    anchorTag.appendChild(monthNumber);


    //adds the href property to the virtual element <a href="four99.html">4</a>
    anchorTag.setAttribute('href', calendar1999[i] + '.html');

    // <li><a href="four99.html">4</a></li>
    listItem.appendChild(anchorTag);

    //inserts the virtual "li" with clickable month into <ul> dom element so it can be seen
    joynal1999.appendChild(listItem);
  }//end month maker for loop
}//end createMonths99 function
Next I modified the simpler calendar function from a week ago so that it dynamically generated the months for the selected year, complete with clickable links for each month. But there was a problem. If you selected say, April of 2004, when you got there, the calendar did not display. You had to choose a year again. This was bad usability. I wanted the calendar to always display all the months of the year you were reading, no matter which month you were reading. But that meant getting the pages to talk to each other. The technical term is: passing data between html pages. I had a vague idea that it might be doable with cookies, but I’ve never baked cookies.
Google to the rescue! I discovered there is a way to store and pass variables between pages that have JavaScript. It’s called localStorage. You can write to it, and pull data from it. As long as they are on a long session on your website, you can make your html pages pass data from page to page.
The first line below listens for you to make a choice from the drop list. If you do ‘change’ it, the script fires off the ‘createYear‘ function.
That function puts the year you chose into a variable called ‘choice‘. At the same time, it places that year into session memory via the localStorage.setItem command. This is like registering at a hotel and telling the concierge that you would like the Seattle Times news paper each time you walk in. He remembers your preference during your session at the hotel…all week long.
As you surf from month to month, the concierge (localStorage data) remembers your year preference and keeps that year’s calendar visible
Next I do a couple checks to see whether this is your second journal month choice, or if you just arrived and haven’t made any previous choices. If the latter, I present the first years calendar, which is 1999.
Further down I have a switch-case conditional that fires off the correct createMonths function for the year you selected.
select.addEventListener('change', createYear);

function createYear(){
  if(select.value) {  //does data exist?
      var choice = select.value;  //ie: 2001
      localStorage.setItem('storageName',choice);// hold on to year choice like a cookie but in virtual session

     //empties out all <ul> from <div id="ulHolder">

      ulHolder.innerHTML = '';
  } else if (localStorage.getItem){// we found from session memory they've chosen a year on a previous page
      ulHolder.innerHTML = '';
      choice = localStorage.getItem('storageName');
  } else {// this is only true on first visit to joynal, new session
    ulHolder.innerHTML = '';
     choice = '1999';
  }
  // create ul
  var makeUl = document.createElement("ul");

  // <ul id="joynal1999"></ul>
  makeUl.setAttribute('id','joynal' + choice);
  makeUl.setAttribute('class', 'calendar')

  ulHolder.appendChild(makeUl);


/*
They drop the select drop list and make
a 'choice' of a year. We capture the year in the
'choice' variable.
So they 'switched' it and
we are examining the variable 'choice'
to see what we should do based on it's value
*/
  switch (choice) {
//in 'case' 'choice' is = to 1999
    case '1999':
    createMonths1999();
    h1.textContent = '1999';
    break;

    case '2000':
    createMonths2000();
    h1.textContent = '2000';
    break;

    case '2001':
    createMonths2001();
    h1.textContent = '2001';
    break;

    case '2002':
    createMonths2002();
    h1.textContent = '2002';
    break;

    case '2003':
    createMonths2003();
    h1.textContent = '2003';
    break;

    case '2004':
    createMonths2004();
    h1.textContent = '2004';
    break;

    case '2005':
    createMonths2005();
    h1.textContent = '2005';
    break;

    case '2006':
    createMonths2006();
    h1.textContent = '2006';
    break;

    case '2007':
    createMonths2007();
    h1.textContent = '2007';
    break;

    case '2008':
    createMonths2008();
    h1.textContent = '2008';
    break;

    case '2009':
    createMonths2009();
    h1.textContent = '2009';
    break;

    case '2010':
    createMonths2010();
    h1.textContent = '2010';
    break;

  }//end switch(choice) case


}//end function createYear()
In other news, Sue and I skied at Paradise yesterday. This was only her second trip of the year. She is still babying her rotator cuff surgery. It was a nice one inch covering of powder over a hard base. It wasn’t grabby, and was lovely skiing, not counting the water runnels, which were as bad as moguls in spots. I went back up for another run, but the fog had settled in, masking the earlier bright blue sky. I turned around before Pan, and finished out the day.
Today I bought a $15 bouquet but discovered I’ve forgotten how to draw. Jeez! I’ve been so lost in programming I’ve not only forgotten how to climb, I can’t draw either. How come I can’t be good at everything? It would be so handy. Perhaps when I get a full time job again and get settled in I can get back to my hobbies. I miss them.
To keep from going crazy with all this studying I’ve been exercising every day and playing a fair amount of ping pong. Last week I played at the local community center with a bunch of seniors. We played doubles, which involves a very intricate dance around the end of the table. You have to hit the ball, but only every other time. This means you hit the ball, then run backwards to get out of the way so your partner can hit it…and repeat. It was so much fun I went to another public game out on 76th.
This was a beast of a different color. They were people of all ages, and they were serious, with a capital S! They literally wiped the floor with me. I lost.every.single.game. That’s nine games in a row, but who is counting? I walked out after an hour. I mean, what was the point? I love the game, but I don’t have the time to develop that kind of skill. I am already neglecting too many hobbies, don’t need to add ping pong to the list. I won’t stop playing, but I will avoid playing with people who live and breath the game.
I studied Sunday so I could play hooky with Christine on Monday at Vantage. Chris was super strong and led Sinsemilla 10c and George and Martha cleanly. I was very rusty after 6 weeks of not climbing. I can’t afford the climbing gym so my arms have become weak. As I said after lowering down from hanging on Pony Keg: “That was not the climber who came back from Joshua Tree on January 2!”
Chris: “I know, I wanted to meet that guy.”
Me: “He is gone, and I wonder if he ever really existed. Perhaps that was just a fairytale from some bizarre alternate universe.”
Such is my life as a 64 year old rock climber. It’s a sport for young people. Trying to do it at my advanced age of decrepitude requires a lot more work than it does for young people. I do the work, and happily, but it requires climbing every weekend, or 5 days straight, whichever comes first.
So now I’m back to my JavaScript studies at this super cool free website:
I’ve been using Evernote to take notes of the stuff I’m learning. But Evernote doesn’t have syntax highlighting. It’s going to clog up this blog with a bunch of code…but I suspect this blog never gets read by anyone but me anyway. Probably I screwed up the search engine functionality or something. Not that I care enough to sort it out. I have bigger priorities, like learning high end JavaScript.
So here is my latest “homework”. I built a barebones image gallery switcher. It’s too boring to show the working example in an iframe. But this is the code that makes it work, which is the fun part for me. On my main website, I use a awesome image gallery function called Photoswipe. You can see it here.
Whoever built that had the job that I want.
Meanwhile, back on the farm, this is the code for the one I built in my lesson. They gave me the images, html and JavaScript. But they only gave me clues as to how to write the script. I’m fairly happy I figured it all out. Baby steps…
// the big images in the gallery
var displayedImage = document.querySelector('.displayed-img');

//the div that contains the dynamically generated thumbs
var thumbBar = document.querySelector('.thumb-bar');

btn = document.querySelector('button');

//a dumb transparent overlay
var overlay = document.querySelector('.overlay');

/* Looping through images in the image folder*/
var allImages = ['pic1', 'pic2', 'pic3', 'pic4', 'pic5'];

for(let i = 0; i < allImages.length; i++){

  //makes a virtual <img > tag
  var newImage = document.createElement('img');

  //changes to <img src="images/pic1.jpg">
  newImage.setAttribute('src', 'images/' + allImages[i] + '.jpg');

  /* below line changes vritual image  class to
  <img src="images/pic1.jpg" class="pic1">
  Have to add 1 to i because in first loop i = 0, but the first
  item in the array, which I'm trying to access, is pic1  */
  newImage.classList.add('pic' + (i+1));

  //adds the new <img ...> to dom at bottom inside of div.thumbBar
  thumbBar.appendChild(newImage);

  /*thumbClass = pic1. Now that I have image on the displayedImage
  I need to grab it's class so I can talk to it*/
    var thumbClass = newImage.getAttribute('class');

    // finds the new <img ...> based on the class added in the loop
    var thumbReady = document.querySelector('.' + thumbClass);

    //makes the new <img ...> be clickable and fires showBig
    thumbReady.addEventListener('click', showBig);


  function showBig(){
    //changes big image to match thumbnail clicked
    //changes path of big image to images/pic1.jpg
    displayedImage.setAttribute('src', 'images/' + allImages[i] + '.jpg');
  }
}//end for loop
/* Wiring up the Darken/Lighten button, not important*/
btn.addEventListener('click', darkLight);
function darkLight(){
  if(btn.getAttribute('class') === 'dark'){
    btn.setAttribute('class','light');
    btn.textContent = 'Lighten';
    overlay.style.backgroundColor = 'rgba(0,0,0,0.5)';
  } else {
    btn.setAttribute('class','dark');
    btn.textContent = 'Darken';
    overlay.style.backgroundColor = 'rgba(0,0,0,0)';
  }
}
I’ve been studying JavaScript full time for a month. Sounds boring, but it’s something that should help make me a more valuable programmer. I take lots of breaks as they say it’s not healthy to stare at a computer for too long. I run downstairs for more coffee, walk out to the shed to do pull ups, do my 50 daily sit ups, or pedal my schwinn airdyne for a lunch break.
I like the way JavaScript blends my existing web knowledge with dynamic functionality. I was working on a calendar lesson that dynamically populates a calendar with the correct number of days in a month. I didn’t like the example in the lesson because they had 4 days in a week, which was just dumb.
I’ve been keeping an eye on the latest trends and remembered that css grids could make a nice calendar. Here it is, with the code down below. I also added in a random color generator for the days. Click a day, and the background color of that list item will change.
var select = document.querySelector('select');
var h1 = document.querySelector('h1');

//begin random number generator
function random(number) {

  // the plus 1 keeps the number 1 or higher
  return Math.floor(Math.random()*(number+1));
}
 function bgChange(){
   // ie: rgb(200, 156, 50)
  return 'rgb(' + random(255) + ', ' + random(255) + ', ' + random(255) + ')';
}

var calendar = document.getElementById('calendar');


select.addEventListener('change', createCalendar);
var days = 0;
function createCalendar(){
  var choice = select.value;
  calendar.innerHTML = '';
  if(choice === 'january' || choice === 'march' ||
  choice === 'may' || choice === 'july' ||
  choice === 'august' || choice === 'october' ||
   choice === 'december' ) {
    days = 31;
  } else if (choice === 'april' || choice === 'june' ||
   choice === 'september' || choice === 'november'){
    days = 30;
  } else if (choice === 'february'){
    days = 28;
  } else {
    days = 0;
  }
  for(let i = 1; i < days+1; i++){//darn start at zero problem fixed by adding 1

  //makes virtual <li></li> but doesn't use it in DOM yet
    var listItem = document.createElement("li");

    //makes a virtual text element from current value of i, but doesn't use it in DOM yet
    var whichDay = document.createTextNode(i);

    // appends or inserts day of month  "i" in virtual <li>i</li>
    listItem.appendChild(whichDay);

    //inserts the virtual "li" with day of month into <ul> dom element so it can be seen
    calendar.appendChild(listItem);
  }


  //console.log(days);
  //console.log(choice);
  switch (choice) {
    case 'january':
      h1.textContent ='January';
      break;
    case 'february':
      h1.textContent ='February';
      break;
    case 'march':
      h1.textContent ='March';
      break;
    case 'april':
      h1.textContent ='April';
      break;
    case 'may':
      h1.textContent ='May';
      break;
    case 'june':
      h1.textContent ='June';
      break;
    case 'july':
      h1.textContent ='July';
      break;
    case 'august':
      h1.textContent ='August';
      break;
    case 'september':
      h1.textContent ='September';
      break;
    case 'october':
      h1.textContent ='October';
      break;
    case 'november':
      h1.textContent ='November';
      break;
    case 'december':
      h1.textContent ='December';
      break;
    default:
      h1.textContent ='make a choice';
  }
  // rgb(200, 156, 50) begin random color clicker function on <li>


   //cycles thru all the <li> and makes an array
  var lis = document.querySelectorAll('li');

  //loops thru all the <li> and sets up onclick
  for (let i = 0; i < lis.length; i++){
    lis[i].onclick = function(e) {
      /*'e' basically means 'this'. So they click a calendar day,
      the <li>, via this/e feels it. To the <li> it adds style="background-color: rgb();"
      and uses an rgb value of bgChange(), which is a function that
      returns rgb(200, 156, 50), or random values of those
      */
      e.target.style.backgroundColor = bgChange();
    }

  }

}//end createCalendar function


![# # Example file for parsing and processing JSON # import urllib import json def printResults(data): # Use the json module to load the string data into a dictionary theJSON = json.loads(data) # now we can access the contents of the JSON like any other Python object if "title" in theJSON["metadata"]: print(theJSON["metadata"]["title"]) # output the number of events, plus the magnitude and each event name count = theJSON["metadata"]["count"] print (str(count) + " events recorded") # for each event, print the place where it occurred for i in theJSON["features"]: print(i["properties"]["place"]) print("-----------------\n")#this runs after the for loops is done # print the events that only have a magnitude greater than 4 for i in theJSON["features"]: if i["properties"]["mag"] >= 4.0: print "%2.1f" % i["properties"]["mag"], i["properties"]["place"] print("-----------------\n")#this runs after the for loops is done # print only the events where at least 1 person reported feeling something print("Events that were felt: ") for i in theJSON["features"]: feltReports = i["properties"]["felt"] if feltReports != None: if feltReports > 0: print "%2.1f" % i["properties"]["mag"], i["properties"]["place"], " reported " + str(feltReports) + " times" def main(): # define a variable to hold the source URL # In this case we'll use the free data feed from the USGS # This feed lists all earthquakes for the last day larger than Mag 2.5 urlData = "http://earthquake.usgs.gov/earthquakes/feed/v1.0/summary/2.5_day.geojson" # Open the URL and read the data webUrl = urllib.urlopen(urlData) print ("result code: " + str(webUrl.getcode()))#returns: 200 = true, it got data if (webUrl.getcode() == 200): data = webUrl.read() printResults(data) else: print("Received error, cannot parse results") if __name__ == "__main__": main()](http://websterart.com/wordpress/wp-content/uploads/2018/03/st-helens_2018_03_11_2968.jpg)